Flagship Build: Arduino Bluetooth Robot Car
This project uses an Arduino Uno, L298N motor driver, HC-05 Bluetooth module, battery pack, and two DC gear motors. The goal is simple: control a moving robot from your phone while learning wiring that actually makes sense.
What you will learn
- How to wire the L298N motor driver correctly.
- How HC-05 Bluetooth serial communication works.
- Why motors need separate power from the Arduino logic circuit.
- How to control speed with PWM pins.
- How to troubleshoot common robot car failures.
Important: Do not power the motors directly from the Arduino 5V pin. Use a battery pack through the L298N motor power input and connect all grounds together.
Parts Needed
| Part | Purpose | Affiliate-ready link |
|---|---|---|
| Arduino Uno | Main controller for motor and Bluetooth commands. | Arduino Uno on Amazon |
| L298N Motor Driver | Drives the DC motors using Arduino control pins. | L298N driver on Amazon |
| HC-05 Bluetooth Module | Receives commands from a phone over Bluetooth serial. | HC-05 on Amazon |
| 2WD Robot Car Chassis | Frame, wheels, TT motors, and caster wheel. | Robot chassis kit |
| Battery Pack | Motor power source, usually 7.4V to 9V depending on kit. | Battery pack options |
| Jumper Wires | Connects Arduino, driver, Bluetooth module, and breadboard. | Jumper wires |
Detailed Wiring Guide
Follow this slowly. Most robot car problems come from weak motor power, missing ground connections, or swapped Bluetooth TX/RX lines.
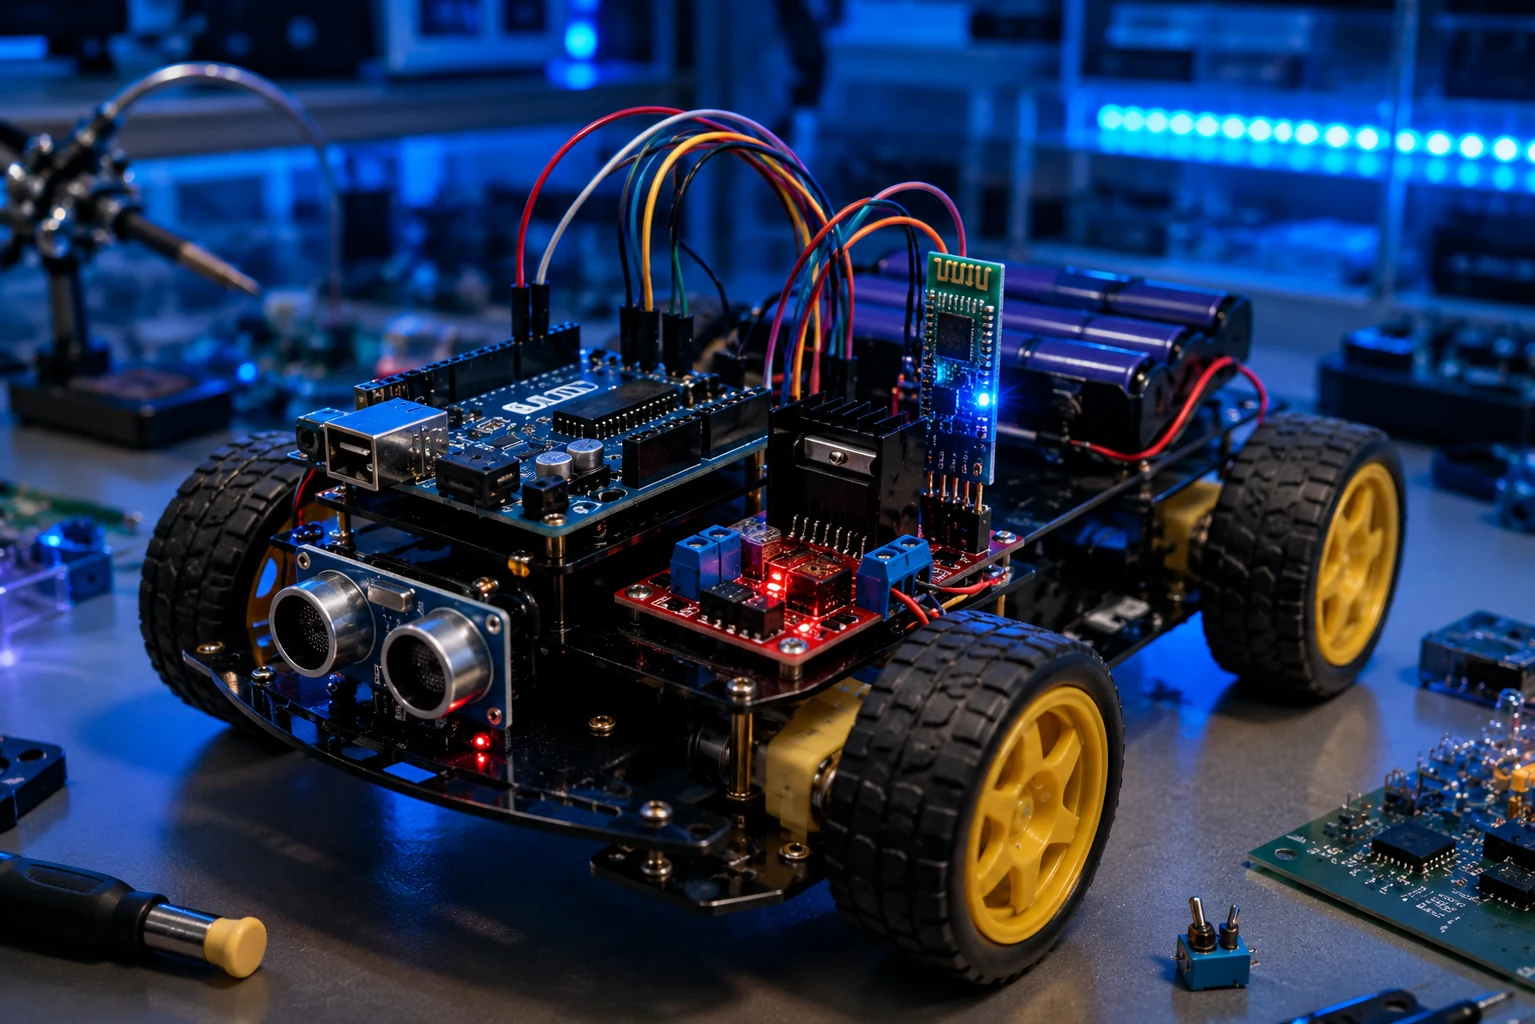
Full wiring overview
Use this image to understand the entire layout before plugging anything in.

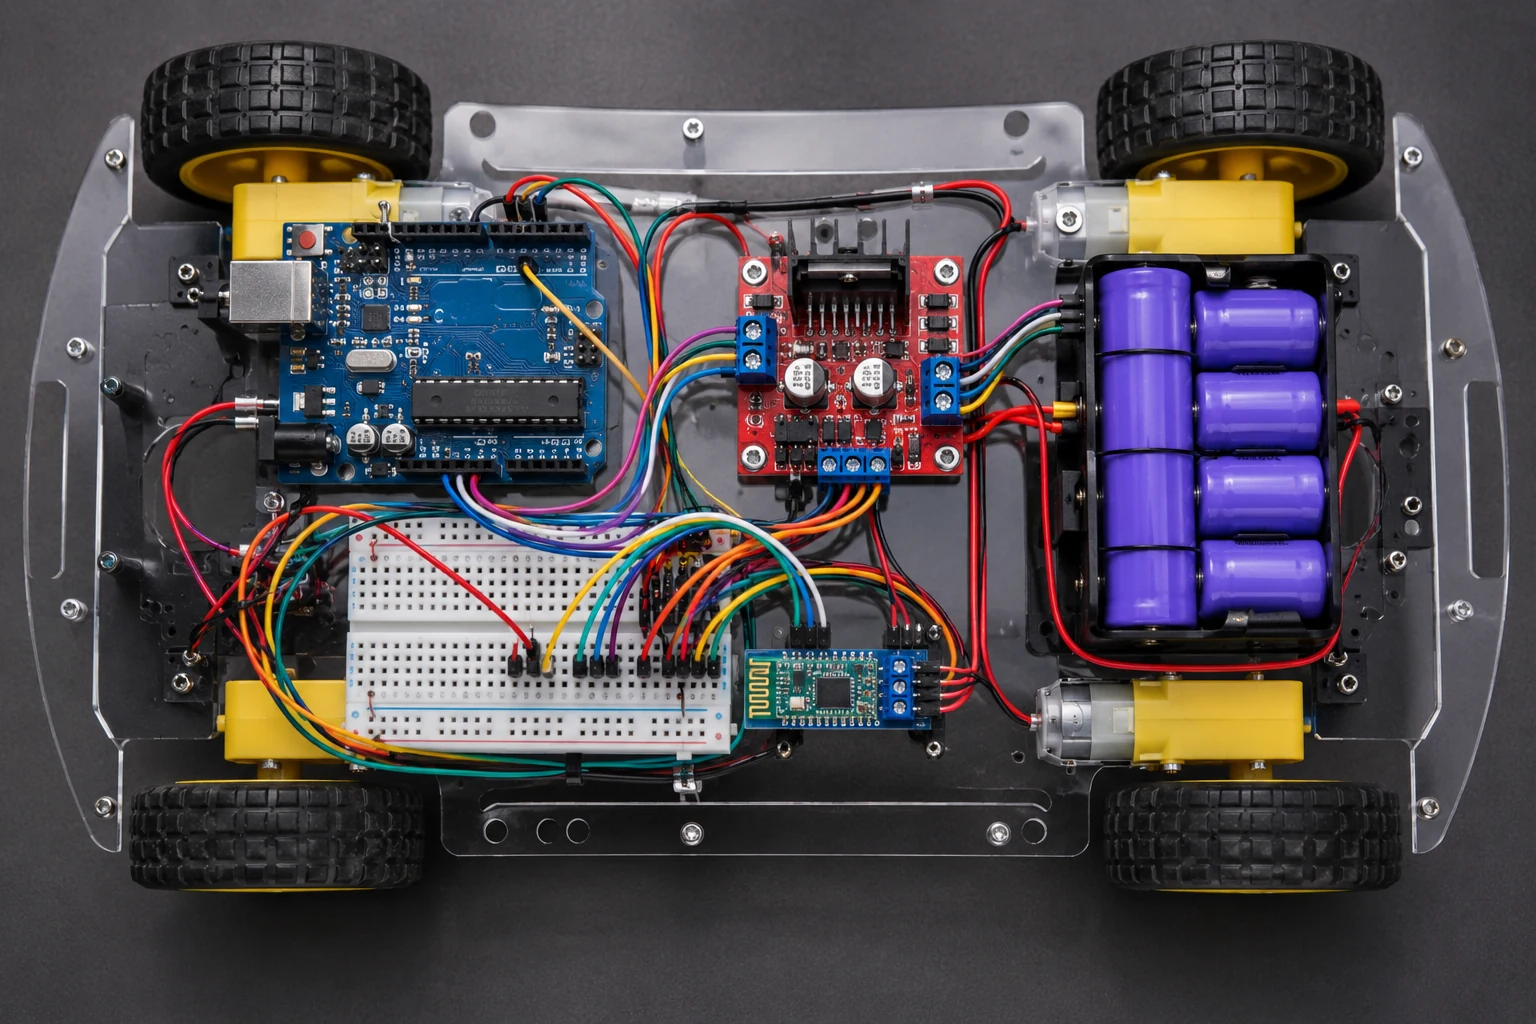
Pinout reference
Keep this open while wiring. It shows the signal flow between the Arduino, L298N, HC-05, and battery pack.
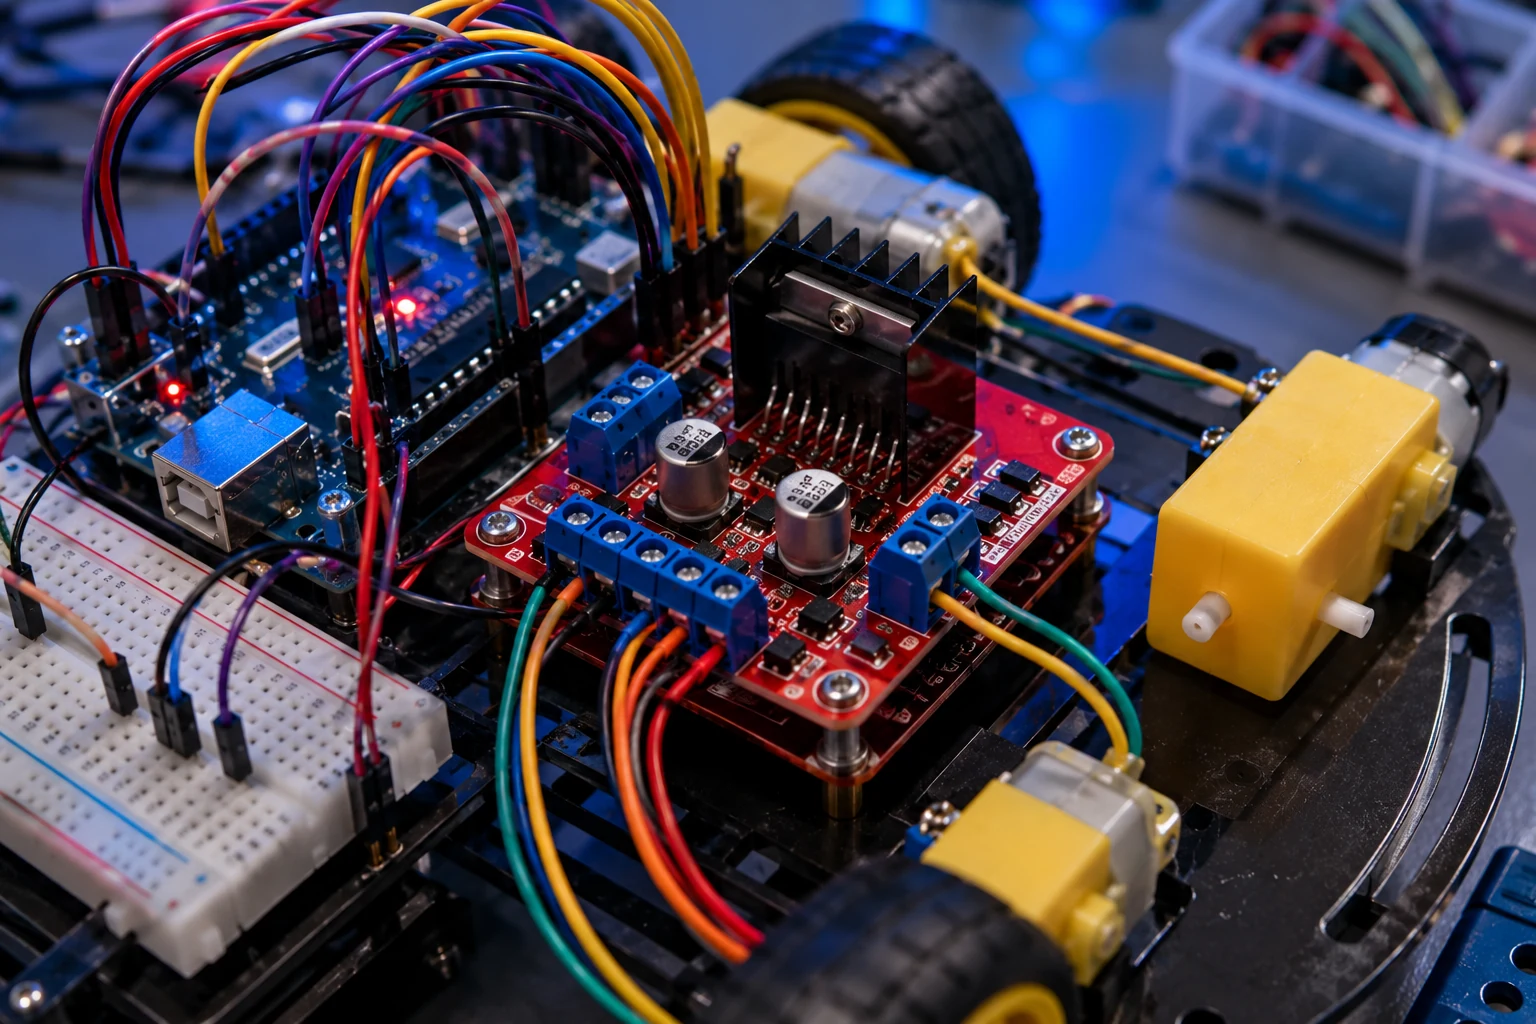
Close-up 1: L298N Motor Driver
Focus on ENA, ENB, IN1, IN2, IN3, IN4, motor outputs, battery positive, and common ground.
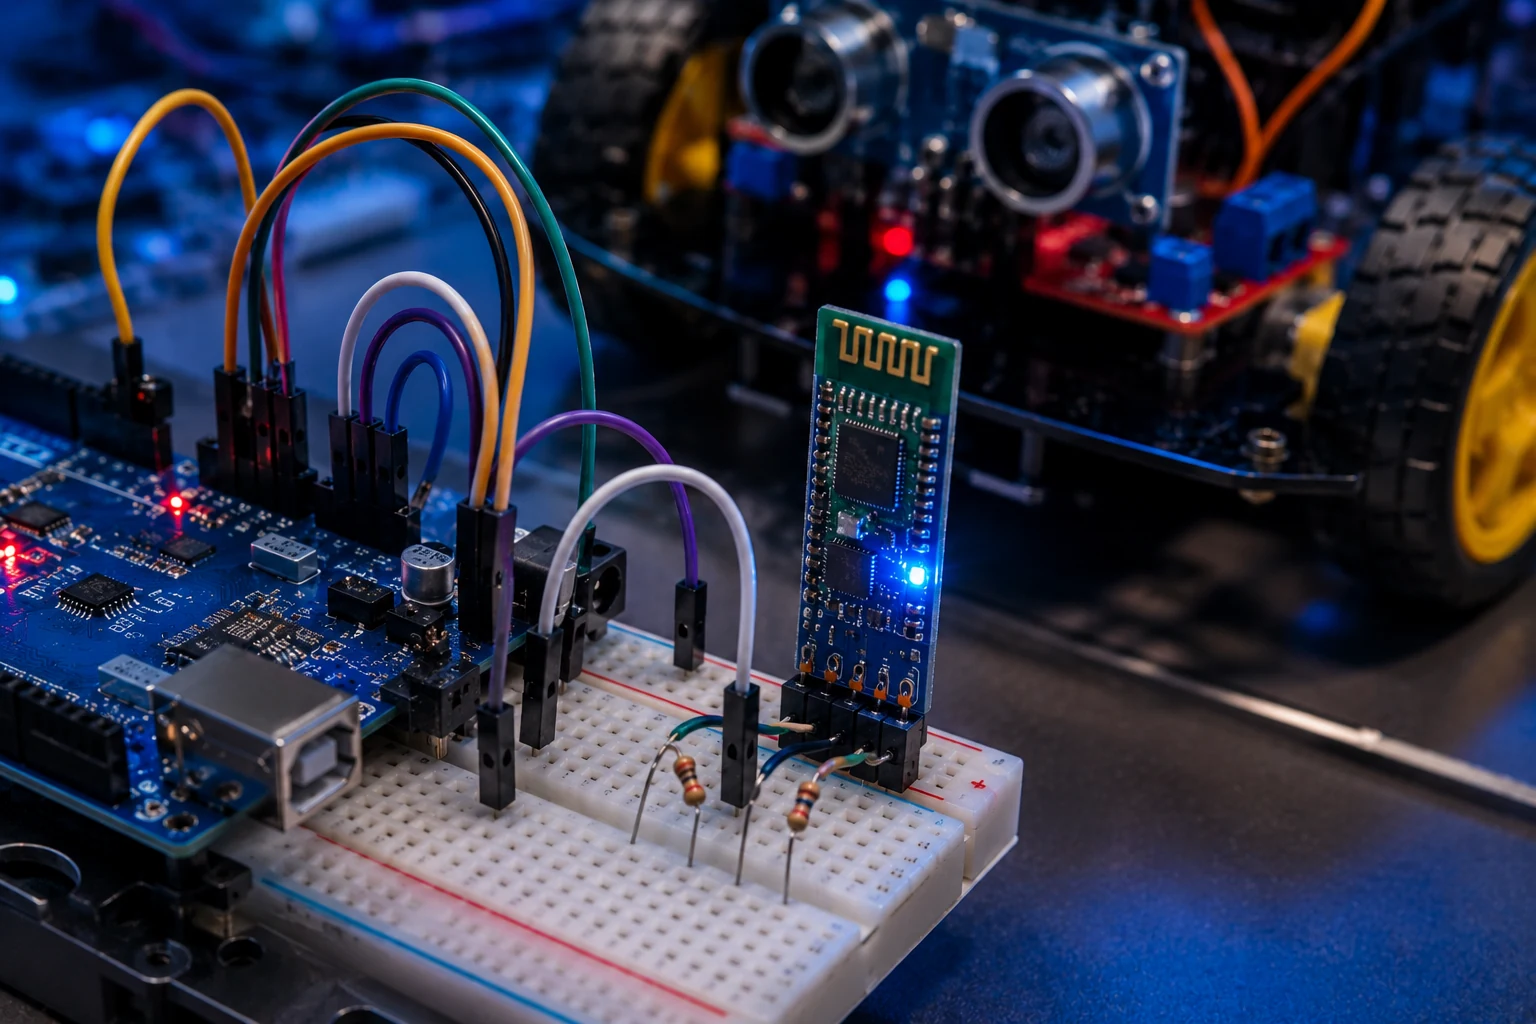
Close-up 2: HC-05 Bluetooth
HC-05 TX goes to Arduino D10. Arduino D11 goes to HC-05 RX through a voltage divider.
Pin Mapping Table
| Component | Connects To | Wire Color Suggestion | Notes |
|---|---|---|---|
| L298N ENA | Arduino D5 | Yellow | PWM speed control for left motor. |
| L298N ENB | Arduino D6 | Yellow | PWM speed control for right motor. |
| L298N IN1 | Arduino D7 | Orange | Left motor direction. |
| L298N IN2 | Arduino D8 | Orange | Left motor direction. |
| L298N IN3 | Arduino D9 | Green | Right motor direction. |
| L298N IN4 | Arduino D12 | Green | Right motor direction. |
| HC-05 TXD | Arduino D10 | Blue | Bluetooth sends data to Arduino receive pin. |
| HC-05 RXD | Arduino D11 through voltage divider | Purple | Protects HC-05 RX from 5V Arduino logic. |
| Battery + | L298N +12V / VIN | Red | Motor power only. |
| All grounds | Arduino GND, L298N GND, HC-05 GND, battery - | Black | Common ground is mandatory. |
Build Steps
- Mount the TT motors and wheels to the robot chassis.
- Attach the Arduino Uno and L298N motor driver to the chassis using standoffs or double-sided mounting tape.
- Connect the left and right motors to the L298N motor output terminals.
- Wire ENA, ENB, IN1, IN2, IN3, and IN4 from the L298N to the Arduino pins listed above.
- Place the HC-05 on a breadboard or small mount. Connect VCC to 5V and GND to common ground.
- Connect HC-05 TXD to Arduino D10.
- Connect Arduino D11 to HC-05 RXD through a voltage divider using 1k and 2k resistors.
- Connect the battery positive to the L298N motor power input and battery negative to common ground.
- Upload the Arduino code with the HC-05 disconnected from D10/D11 if upload errors occur.
- Pair your phone with the HC-05 and send commands using a Bluetooth serial controller app.
Bluetooth Commands
| Command | Robot Action |
|---|---|
| F | Move forward |
| B | Move backward |
| L | Turn left |
| R | Turn right |
| S | Stop |
| 0-9 | Optional speed level control |
Full Arduino Code
#include <SoftwareSerial.h>

SoftwareSerial bluetooth(10, 11); // HC-05 TX to D10, HC-05 RX to D11 through divider

const int ENA = 5;
const int ENB = 6;
const int IN1 = 7;
const int IN2 = 8;
const int IN3 = 9;
const int IN4 = 12;

int motorSpeed = 180;

void setup() {
  pinMode(ENA, OUTPUT);
  pinMode(ENB, OUTPUT);
  pinMode(IN1, OUTPUT);
  pinMode(IN2, OUTPUT);
  pinMode(IN3, OUTPUT);
  pinMode(IN4, OUTPUT);

  Serial.begin(9600);
  bluetooth.begin(9600);
  stopCar();
}

void loop() {
  if (bluetooth.available()) {
    char command = bluetooth.read();
    Serial.println(command);

    if (command >= '0' && command <= '9') {
      motorSpeed = map(command - '0', 0, 9, 90, 255);
      return;
    }

    switch (command) {
      case 'F': forward(); break;
      case 'B': backward(); break;
      case 'L': left(); break;
      case 'R': right(); break;
      case 'S': stopCar(); break;
      default: stopCar(); break;
    }
  }
}

void setSpeed() {
  analogWrite(ENA, motorSpeed);
  analogWrite(ENB, motorSpeed);
}

void forward() {
  setSpeed();
  digitalWrite(IN1, HIGH);
  digitalWrite(IN2, LOW);
  digitalWrite(IN3, HIGH);
  digitalWrite(IN4, LOW);
}

void backward() {
  setSpeed();
  digitalWrite(IN1, LOW);
  digitalWrite(IN2, HIGH);
  digitalWrite(IN3, LOW);
  digitalWrite(IN4, HIGH);
}

void left() {
  setSpeed();
  digitalWrite(IN1, LOW);
  digitalWrite(IN2, HIGH);
  digitalWrite(IN3, HIGH);
  digitalWrite(IN4, LOW);
}

void right() {
  setSpeed();
  digitalWrite(IN1, HIGH);
  digitalWrite(IN2, LOW);
  digitalWrite(IN3, LOW);
  digitalWrite(IN4, HIGH);
}

void stopCar() {
  digitalWrite(IN1, LOW);
  digitalWrite(IN2, LOW);
  digitalWrite(IN3, LOW);
  digitalWrite(IN4, LOW);
  analogWrite(ENA, 0);
  analogWrite(ENB, 0);
}
Troubleshooting
Motors do not move
Check battery voltage, L298N power input, ENA/ENB pins, and common ground. Weak batteries are the number one cause.
Bluetooth pairs but does nothing
Swap TX/RX if needed, confirm 9600 baud, and make sure your phone app sends single letters like F, B, L, R, and S.
Robot spins instead of driving straight
One motor may be reversed. Swap that motor's two wires at the L298N output terminal.
Arduino resets when motors start
Your motor power is pulling the voltage down. Use a stronger battery pack and avoid powering motors from Arduino 5V.
Related Build Videos
Use these three video popups as a support path: full robot car build, L298N motor driver wiring, and HC-05 Bluetooth voltage-divider setup. Click a card to open the video in the lightbox.
Coming Next
Arduino Weather Station
OLED display, sensor data, and clean dashboard-style wiring.
Arduino GPS Tracker
Serial GPS data, location logging, and portable power.
Arduino Smart Irrigation
Soil moisture sensor, relay control, pump safety, and automation.
Ready for the next build?
Save this robot car tutorial, then head back to WolfieWeb or the Arduino tutorial hub for more projects.